

Tired of looking at those torn, faded screens on your windows? It’s a common sight around Phoenix, but you don't have to live with it. Replacing the mesh is a project most homeowners can tackle themselves, and the payoff is huge. You’re not just fixing an eyesore—you're restoring your home's first line of defense against pests and boosting your curb appeal in a single afternoon.
Your Guide to a Flawless Screen Replacement
A ripped or sun-bleached window screen is more than just a cosmetic issue. Here in Scottsdale, Peoria, and across the Valley, it’s a breach in your home’s comfort. It lets in bugs, reduces airflow, and just looks plain bad. Learning how to properly replace screen mesh is one of the most valuable skills a homeowner can have, especially in Arizona.
This isn't going to be your typical, generic tutorial. We’re diving into the specific techniques the pros use to get a professional, long-lasting finish that stands up to our intense sun. Say goodbye to the frustration of wrinkled mesh and splines that pop out. We'll show you how to get that tight, drum-like finish every single time.
Why Quality Installation Matters
It’s no surprise that the window screen market is booming, hitting USD 2.41 billion in 2024, largely because of residential demand in sun-drenched places like Phoenix. But here’s a statistic that should get your attention: industry estimates suggest about 65% of DIY screen jobs end up with uneven tension or start tearing within the first year.
Our harsh climate is brutal on screens, with UV degradation often limiting their lifespan to just 7-10 years. A truly professional installation, however, can add years to that. You can read more about these market trends in recent industry reports.
The goal isn't just to swap out the mesh. It's to create a durable, perfectly tensioned barrier that looks like it came straight from the factory. A sloppy job is easy to spot and almost always fails, forcing you to do it all over again.
What to Expect From This Guide
We'll walk you through the entire process, from putting together your tool list to making that final, clean trim. You'll learn the real-world differences between mesh types and, more importantly, which ones actually survive relentless sun and dust storms.
By the time you're done, you'll have mastered a few key techniques that will save you hundreds on a professional service call and bring back that clean, polished look your home deserves.
Choosing the Right Tools and Materials
Walking into a hardware store for a project like this can be a little intimidating. The good news? You don't need a whole workshop to replace a window screen. Getting a professional finish comes down to having just a few key items.
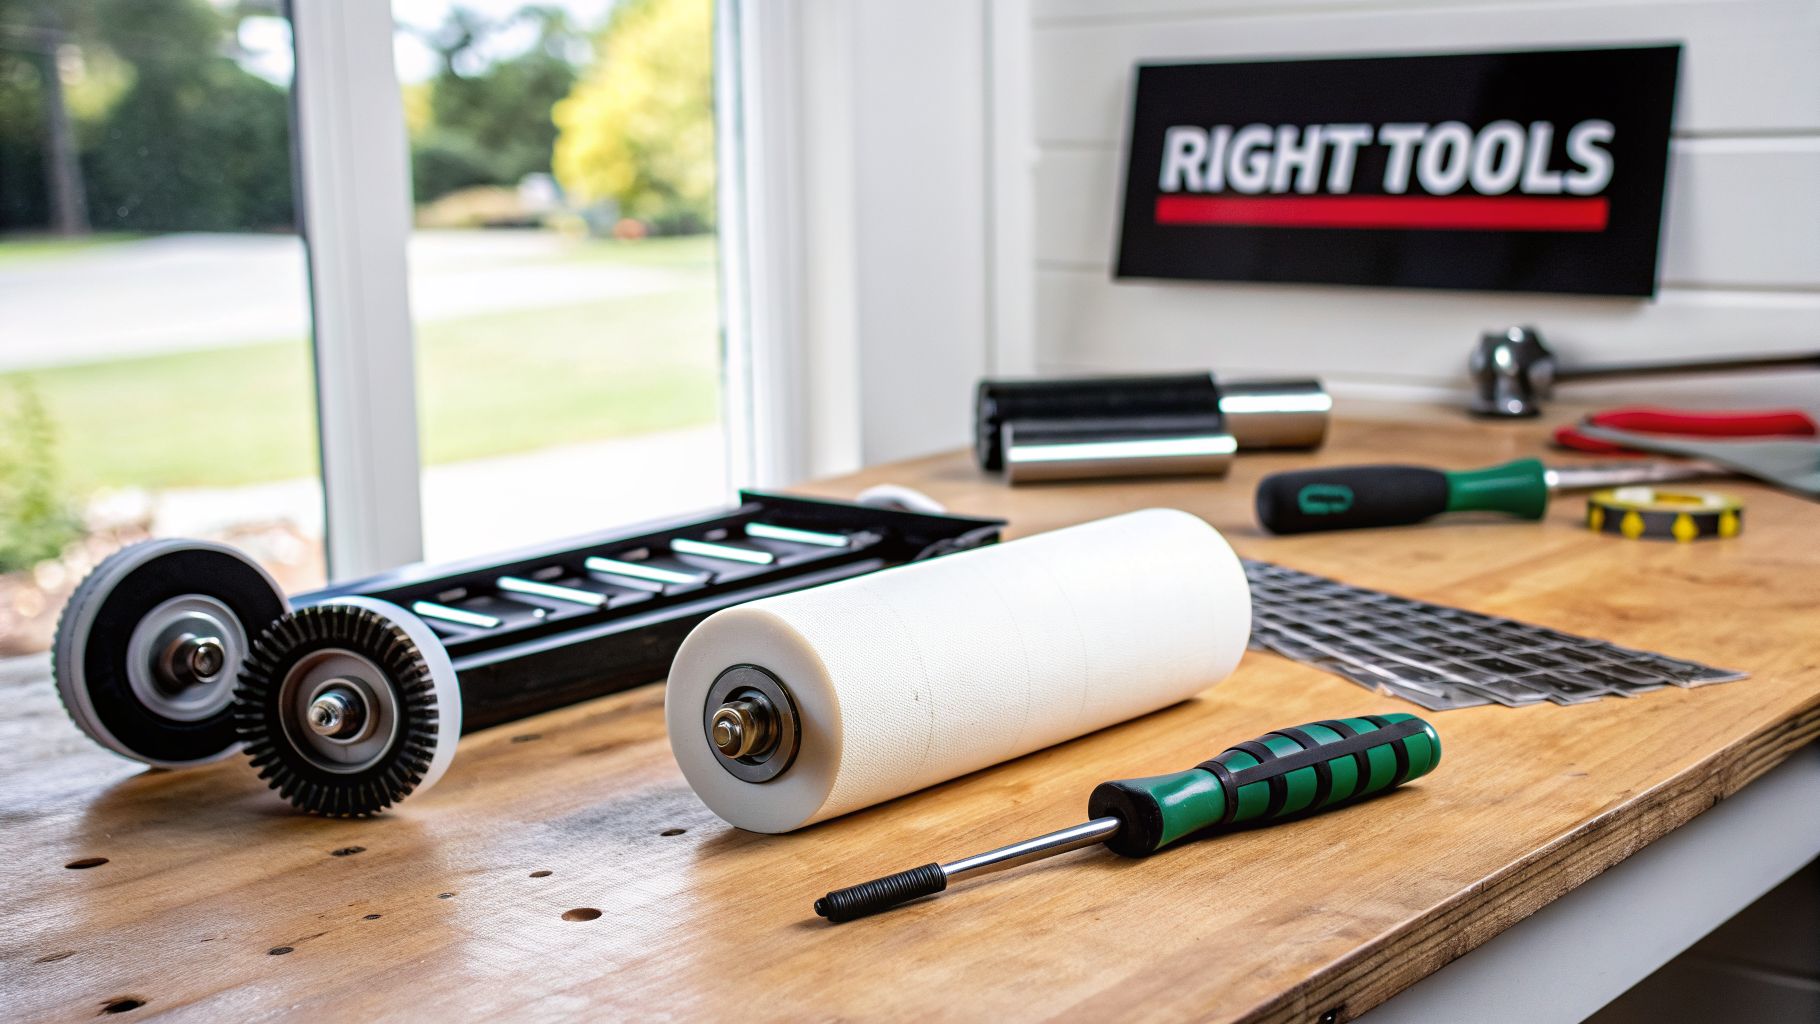
The single most important tool you'll buy is the spline roller. Don't just grab any old one. You need a dual-sided roller that has both a convex (rounded) wheel and a concave (grooved) wheel. Here’s the trick: you use the rounded wheel first to gently press the mesh into the frame’s channel without tearing it. Then, you follow up with the grooved wheel to firmly seat the spline on top. Using both sides correctly is what separates a tight, professional-looking screen from a saggy, frustrating mess.
Selecting the Right Screen Mesh
This is where I see a lot of homeowners go wrong, especially here in Arizona. The standard mesh you see everywhere isn't always the best pick for our intense climate. The right choice affects not just how long your screen lasts, but also how comfortable your home is.
Here’s a quick rundown of your main options:
- Fiberglass Mesh: This is the standard, budget-friendly choice. It’s flexible, doesn't dent, and is pretty forgiving for first-timers. It works perfectly for most windows that aren't getting hammered by direct sunlight all day.
- Solar Screen: If you have windows that face the full force of that Phoenix sun, a solar screen is a no-brainer. This thicker mesh is designed to block 80-90% of UV rays and heat. It makes a real difference in your cooling costs and stops your furniture and floors from fading.
- Pet-Resistant Screen: For anyone with cats that climb or a dog that scratches at the door, this stuff is a lifesaver. It’s made from a tough, vinyl-coated polyester that can stand up to claws and paws without shredding.
Getting the Spline Size Correct
The last piece you need is the spline—that little rubber cord that locks everything in. Using the wrong size is probably the number one reason DIY screen jobs fail. It either won't hold the mesh tight or you won't be able to force it into the channel at all.
The absolute best way to get the right size is to cut out a small, intact piece of your old spline and take it with you to the hardware store to match it. If your old spline is gone or crumbles to dust, just buy the two most common sizes—usually .140" and .125". Spline is cheap, and having both on hand will save you a return trip.
It's a huge market; North America alone accounts for nearly 39% of the USD 34.50 billion global window coverings market as of 2023. Yet, for homeowners doing it themselves, the failure rate for getting the spline right is surprisingly high at around 52%. Even the industry-standard 18×16 fiberglass mesh, popular since the 1980s because it resists sagging 50% better than cheaper options, degrades 15% quicker under the intense glare we get in the Phoenix Valley. You can see more data on window covering market trends if you're curious.
Getting the Old Screen Out Without Damaging the Frame
This is the first moment where a simple DIY project can go wrong. A bent or warped frame will stop you in your tracks, turning a quick fix into a much bigger headache. The goal here is simple: get the screen frame out of the window without forcing anything.
Look closely at your screen frames, especially on modern Arizona homes. You should find small pull tabs or visible springs. Gently pull those tabs toward the middle of the screen. This retracts the tension clips, letting you push the frame out from inside. Whatever you do, don't try to pry the frame itself with a screwdriver—that aluminum will bend much easier than you think.
Tackling the Old Spline
With the frame laying on a flat work surface, your next opponent is the old spline. After years baking in that intense Phoenix sun, this rubbery cord is probably hard and brittle. Don't expect to pull it out in one clean piece.
Grab a small flathead screwdriver or even a utility knife. Find a starting point, usually in a corner, and carefully dig the tip of your tool underneath the spline to lift an end. Once you get a little bit up, you can start pulling. It will almost certainly break into several pieces, and that’s perfectly fine.
I can't stress this enough: be patient here. If you get aggressive and your tool slips, you can scratch the frame's paint or, worse, gouge the spline channel. A damaged channel makes installing the new screen nearly impossible.
The Step Everyone Skips: Cleaning the Channel
Once the old spline and mesh are out of the way, take a look inside the frame’s channel. You'll see it’s caked with years of dust and grime. Do not skip this part. Cleaning the channel is probably the single most overlooked step, but it’s absolutely critical for a good result.
A clean channel is the foundation for a tight, long-lasting screen. If you leave debris in there, the new spline won't seat properly. This leads to a loose screen or a spline that pops right back out after a few weeks.
You’ve got a few easy ways to get it clean:
- Stiff-bristled brush: An old toothbrush is perfect for scrubbing out the gunk.
- Compressed air: If you have an air compressor, a quick blast will clear the channel in seconds.
- Damp cloth: For the final bits of fine dust, wrap a damp rag around your screwdriver tip and run it through the channel.
If you get the old screen out and realize the frame is just too bent or damaged to reuse, it might be time to call in a pro. Understanding your options for window screen frame repair can save you a ton of frustration. A solid, clean frame is what separates a DIY job from a professional one.
Getting That Drum-Tight Finish When Installing Your New Screen
This is where the magic happens. The difference between a saggy, amateur-looking screen and a professional, drum-tight finish all comes down to technique. Let's get this right so your hard work pays off.
First things first, lay your new mesh over the frame. You'll want it to overhang the channel on all four sides by at least 1 to 2 inches. Don't try to save a few pennies by cutting it too close—that extra material is your handle, giving you the leverage you need. Just smooth it out gently by hand for now; the real tensioning comes later.
Proper prep work is everything. If you've already removed the old screen and cleaned out the frame's channel, you're ready for the fun part.
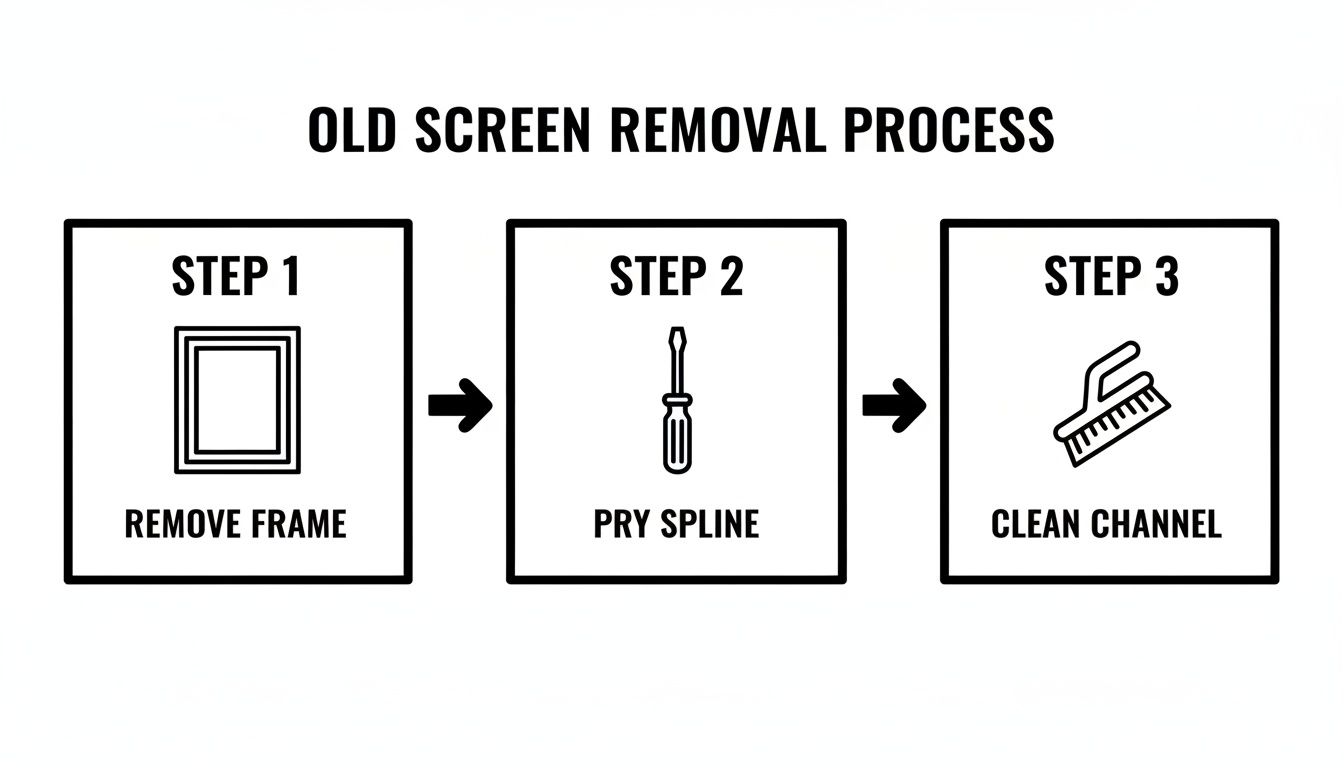
These three steps—removing the frame, pulling out the old spline, and cleaning the channel—are non-negotiable for a repair that's going to last.
The Two-Pass Method: Your Secret to Success
The real trick to getting an even, tight screen is what I call the "two-pass" method. It all comes down to using both sides of your spline roller correctly.
Start on one of the shorter sides of your frame. Grab your spline roller and use the convex (rounded) wheel to gently press the screen mesh down into the channel. You're not trying to lock it in yet, just creating a small depression for the spline to follow.
Next, grab your new spline. Using the concave (grooved) wheel on your roller, press the spline down firmly into that same channel, right on top of the mesh. That grooved wheel is designed to grip the spline and seat it perfectly, locking the screen in place.
My biggest piece of advice: Don't cut the spline to length yet. Just work directly from the roll. This stops you from accidentally cutting it too short and makes dealing with the corners a thousand times easier.
Once that first side is anchored, move to the opposite short side. Give the mesh a gentle pull to take out the slack—you want it taut, not stretched. Then, repeat the exact same two-pass process: pre-seat the mesh with the convex wheel, then drive the spline in with the concave wheel. This creates a perfectly balanced tension across the screen.
Nailing the Corners and Final Sides
With your two short sides done, it's time to tackle the long sides. Pick one and repeat the process. You’ll feel the screen start to pull nice and tight across the middle as you go. That's a good sign!
Getting the corners right is crucial for a clean look and a strong hold. Here’s how I do it:
- Roll the spline right up to the corner, pressing firmly.
- Use the tip of a flathead screwdriver to poke the spline snugly into the corner.
- Keep rolling right around the bend and down the next side without cutting the spline.
Finishing with one continuous piece of spline makes the whole frame stronger than if you cut a separate piece for each side. After all four sides are done, go back and give each corner one last firm press before trimming the excess spline with your utility knife.
Trust me, this method works. Taking the time to pre-seat the mesh with the convex wheel first prevents about 75% of the sagging I see on screens that are only a year or two old. With the insect screen market projected to hit USD 1,184.19 million by 2032, knowing how to do a quality installation yourself is a skill that really pays off.
Finishing Touches and Knowing When to Call for Backup
Alright, the spline is in and your new mesh is pulled nice and tight. You’re on the home stretch, but don't get ahead of yourself. This final trim is what truly separates a decent DIY job from one that looks professionally done.
Patience is your best friend here. If you rush and your utility knife slips, you could easily gash the screen you just worked so hard to install, and you’ll be starting from scratch. A dull blade is just as bad—it won't slice cleanly. Instead, it will snag and pull at the fibers, leaving a fuzzy, jagged edge that screams "amateur."
Trimming for a Clean, Professional Edge
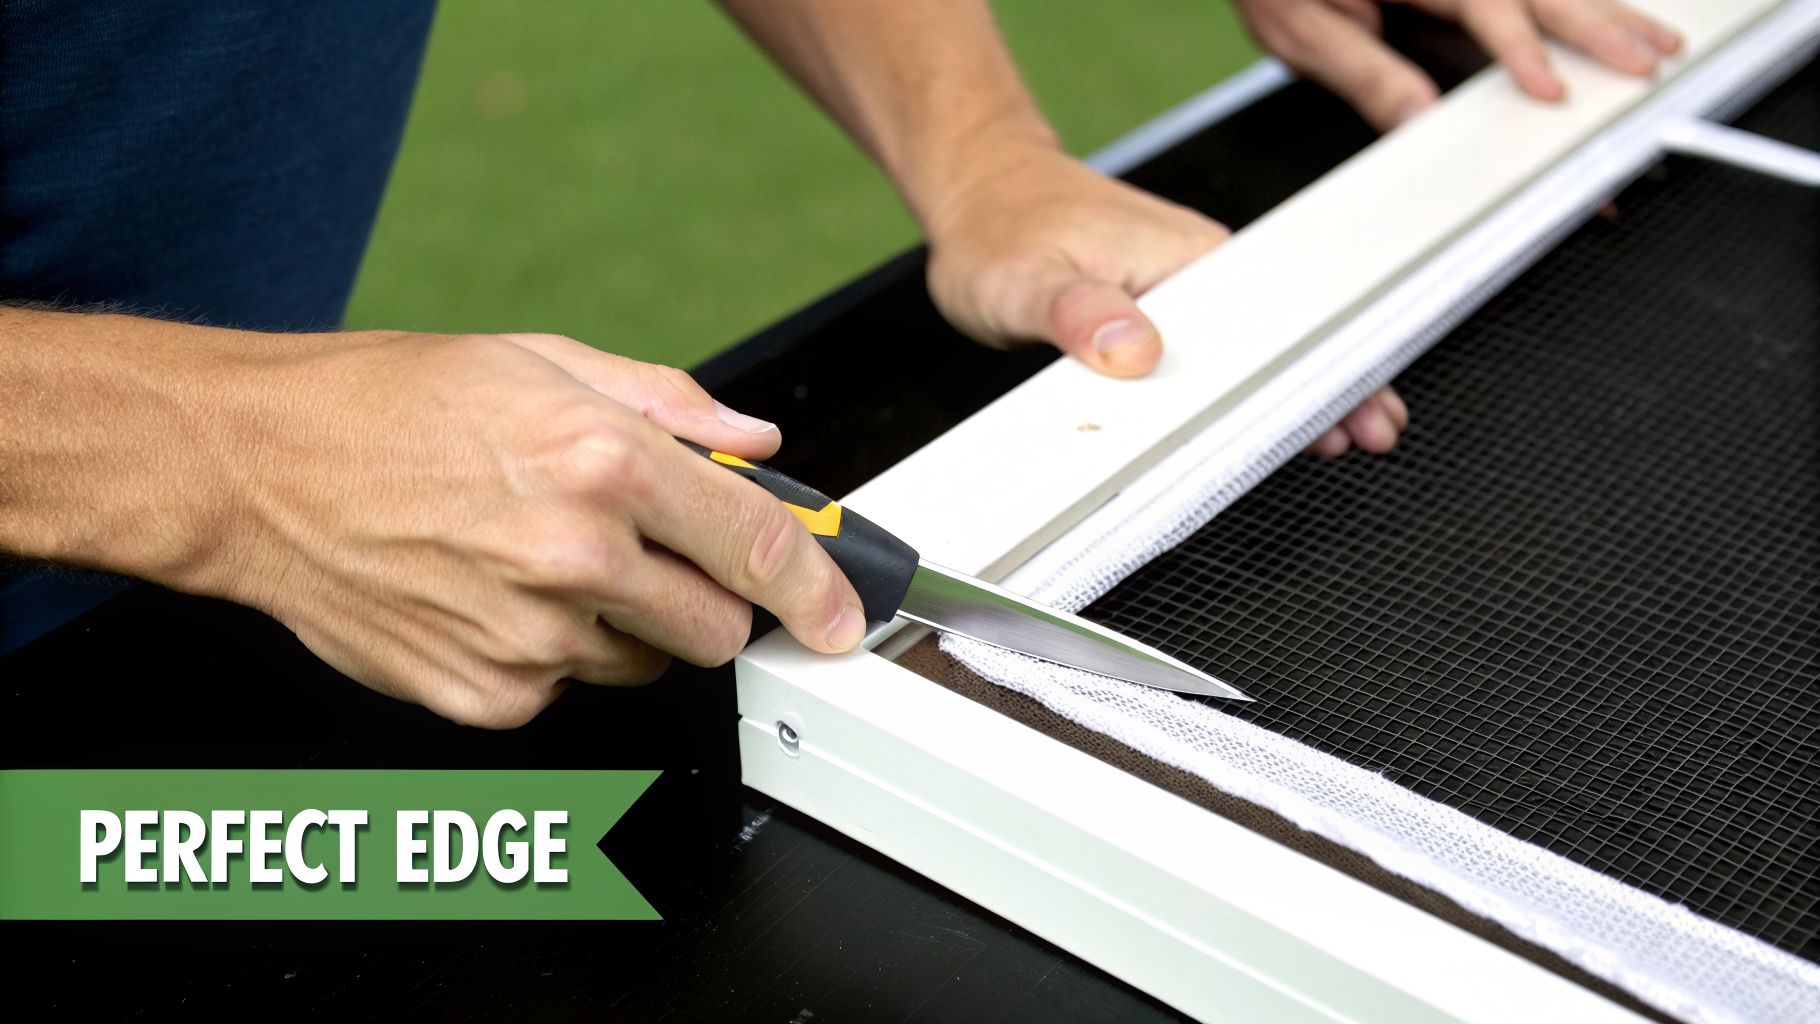
To get that crisp, factory-finished look, you'll need a sharp utility knife. Hold it at a shallow 45-degree angle, making sure the blade is angled away from your new spline. You're going to use the metal frame itself as a straightedge.
This angle is everything. It lets you cut off the excess material right at the edge of the spline channel without any danger of slicing the spline or the tensioned part of the screen.
Using light, steady pressure, guide the knife along the entire frame. Think of it as one smooth, continuous motion, not a back-and-forth sawing action. If you do it right, the leftover mesh will simply fall away, leaving you with a perfectly clean line.
The final trim is the moment of truth. A sharp blade and a steady hand are non-negotiable here. It’s this small detail that makes the difference between a project that looks homemade and one that looks like a pro was there.
When to Skip the DIY and Call a Professional
Knowing how to replace a window screen is a great homeowner skill. But just as important is knowing your limits. Sometimes, what seems like a simple screen replacement is actually a bigger issue, and calling a pro is the smarter, safer, and ultimately more cost-effective move.
You should seriously consider calling for help in these situations:
- Bent or Damaged Frames: If the aluminum frame itself is bent, cracked, or warped out of shape, new mesh isn't going to fix it. A professional can often repair the existing frame or, if needed, build a brand-new one to the exact dimensions.
- Oversized Screens: Ever tried to wrestle with a giant patio door screen on your garage floor? It's a nightmare. These larger screens require a huge, perfectly flat surface and are incredibly difficult to tension properly without a specialized worktable.
- Oddly Shaped Windows: Arched, circular, or other custom-shaped windows demand a level of precision that’s tough to master without years of experience and the right tools.
- Hard-to-Reach Windows: For screens on a second or third story, safety is the number one priority. A professional service has the proper ladders, equipment, and insurance to tackle the job without any risk to you or your home.
A pro ensures the job gets done right the first time, especially with these trickier installations. Now that you've got beautiful new screens, the next step is keeping them that way. For expert advice, take a look at our guide on how to clean window screens the right way.
Common Questions About Window Screen Replacement
Even the most straightforward DIY project has its "gotcha" moments. After years of replacing window screens all over the Phoenix valley, we've heard just about every question there is. Let's tackle some of the most common roadblocks people run into when they're learning how to replace their own window screen mesh.
Think of this as the advice you'd get from a seasoned pro leaning over your shoulder. A little insider knowledge can be the difference between a frustrating afternoon and a job you're proud of.
What Is the Best Screen Mesh for the Arizona Sun?
For many homes around Phoenix and Scottsdale, standard vinyl-coated fiberglass mesh is a perfectly fine choice. It's the go-to for a reason: it's affordable, pretty forgiving to work with, and does the job. But—and this is a big but for us in Arizona—if the window gets hammered by the sun all afternoon, you really should consider upgrading to a solar screen.
Think of a solar screen as sunglasses for your windows. These are heavy-duty screens specifically designed to block 80-90% of UV rays and heat before they can bake your glass. It makes a huge difference in keeping your home cooler and also stops your furniture, floors, and art from fading. That extra cost upfront? It often pays for itself within just a few scorching summers through lower cooling bills.
How Do I Know What Spline Size to Buy?
Getting the spline size right is one of those small details that can make or break the whole project. The most foolproof method, by far, is to take a small, undamaged piece of your old spline with you to the hardware store. You can lay it right next to the new options and find a perfect match.
What if your old spline has disintegrated into dust? Your best bet is to buy the two most common sizes, which are typically .140" and .125". Spline is cheap, and having both on hand is a lot better than making a second trip to the store mid-project out of sheer frustration.
The right spline should feel snug as you press it into the channel with your roller. You shouldn't have to fight it with brute force, but it definitely shouldn't feel loose or pop out on its own. Nailing this part is the secret to a tight, long-lasting screen.
Can I Fix Wrinkles in My New Screen?
Yes, and don't panic! Wrinkles are almost always caused by uneven tension when you were rolling in the spline. The trick is to fix them patiently without yanking the whole thing out.
To smooth out a wrinkle, use your utility knife or a small screwdriver to carefully lift out the spline just on the wrinkled side, plus one of the adjacent sides. Gently pull the mesh taut away from the wrinkle until it's flat, then carefully re-roll the spline back into its channel. It might take a try or two to get it perfect.
If you’ve got wrinkles all over, it's a sign the tension was off from the start. In that case, you may need to pull out all the spline and start fresh, focusing on keeping that gentle, even pull on the mesh as you work. For more complex issues or if you're just feeling stuck, getting some professional advice on window screen repair near you can be a huge help.
Is Hiring a Pro Worth It for Just One Screen?
For a single, easy-to-reach screen, it really comes down to what your time is worth. While it’s a very doable DIY, a pro can knock it out in minutes with a flawless result, guaranteed. The cost for one screen is usually quite reasonable, often falling between $20 to $50 for labor plus materials.
Hiring a professional becomes a no-brainer if:
- The window is on a second story or in a tricky spot.
- The frame itself is bent or damaged.
- You just don't have the time, tools, or patience for it.
A pro service saves you the hardware store run and the risk of buying the wrong materials. You get peace of mind knowing the job is done right the first time, safely and efficiently.
When your screens need more than just a new mesh, or if you'd simply rather leave it to the experts, Sparkle Tech Window Washing LLC is here to help. We provide top-notch screen repair and replacement services across the Phoenix area. Get your free estimate today!